Save up to $99 by installing AT&T Internet Service by Yourself.
Self-installation is easier than you imagine, and it puts you in control of your internet setup. Did you know? AT&T is the largest fixed broadband provider in the United States, with over 15 million subscribers. In fact, roughly 65% of AT&T customers opt for self-installation over professional installation.
To start opting for self-installation you can easily order a self-installation kit either online or by phone when signing up for AT&T internet plan. This comprehensive guide will walk you through the entire AT&T Internet self-installation process using the self-installation kit.
Let’s roll up our sleeves and get started!
Related Article: AT&T Internet 500 Review
How Difficult is it to Self-Install AT&T Internet?
Self-installing AT&T Internet is not difficult if you follow the instructions.
You might be wondering how difficult it is to self-install AT&T Internet. The answer is, it depends on your situation and your level of comfort with technology. But, most people find it easy and convenient to set up with the help of the self-installation kit and the AT&T Smart Home Manager app. The installation kit also comes with a manual that provides clear and detailed steps for each part of the installation process.
AT&T says the average time to complete the self-installation is about 30 minutes. However, this may vary depending on your home layout, internet plan, and technical skills.
Pros
- Save money and time
- Have more flexibility and control
- Learn new skills and knowledge
- Get satisfaction and pride
Cons
- Encounter technical difficulties
- Lack of professional support
AT&T Internet Self-installation Kit
When you opt for AT&T internet self-install, you will need a self-installation kit. This kit contains everything you need for a smooth setup process. You can order a self-installation kit for free when you sign up for AT&T internet service online or by phone. However, if you have already signed up for AT&T internet service but did not request a kit, a quick call to AT&T service will do the trick.
So, what exactly does this kit include? The AT&T self-installation kit includes the following items:
- AT&T Wi-Fi Gateway
- Green Data Cable (for AT&T Traditional Internet)
- Red ONT Ethernet Cable (for AT&T Fiber)
- Yellow Ethernet Cable
- Power Cord
- Gray Phone Cable (for AT&T Phone service)
- Instruction Manual
Related Article: AT&T Internet 75 Review
How Does AT&T Internet Self-Installation Work?
Here’s a detailed guide to help you navigate the AT&T Internet self-installation process.
Self-Installation of AT&T Fiber
Step 1: Connect the AT&T Fiber Service Box
This box, known as the Optical Network Terminal (ONT), links your home to AT&T’s system. Identify a suitable spot for the ONT, usually in your basement, garage, or utility closet. Take off the cover and plug in the following:
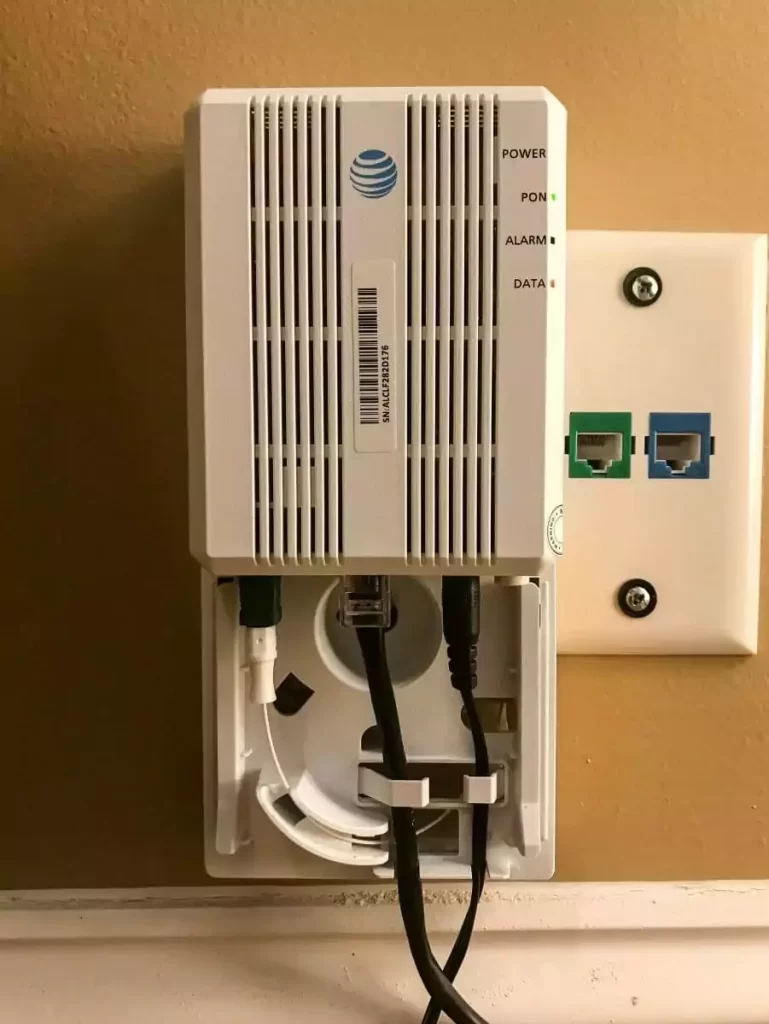
- Red ONT Ethernet Cable: Connects to the Ethernet port on the service box.
- Green Fiber Connector: Links to the green PON port.
- Black Power Cord: Powers the service box. Ensure it’s connected to an outlet and the power button (ON/ OFF) is switched on.
Wait for the Power and PON lights to turn solid green, indicating a successful connection. Then proceed to the next step.

Step 3: Set Up Wi-Fi Network
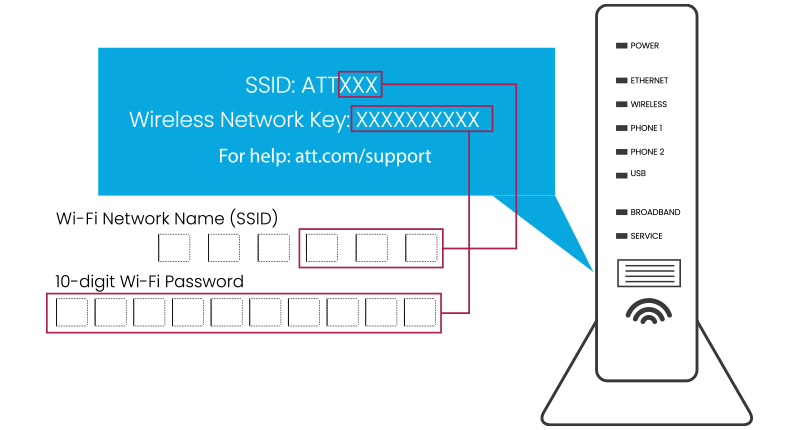
On your computer or device, navigate to the Wireless Network Settings. Choose your Wi-Fi Network Name (SSID), typically found on the sticker at the backside of the Gateway. Input your 12-digit password (also on the Gateway sticker). Open a web browser, register, or log in at att.com/Uverse, and you’re connected!

Step 4: Personalizing Wi-Fi Settings
When you have everything set up and working correctly, now is the best time to decide the name of your Wi-Fi network. Use the Smart Home Manager app or visit att.com/smarthomemanager to set a unique name and password for your Wi-Fi network to easily connect additional devices.
Self-Installation of AT&T Traditional Internet
Step 1: Connecting Your Gateway
Your AT&T equipment package includes color-coded wiring, which aligns with the color-coded ports on your Gateway:
- Green Data Cable: Connects to the green port and your wall jack. If using traditional phone service, it plugs into your dual-port filter.
- Gray Cable: Links the Gateway’s Phone Lines 1 & 2 ports with your phone. For traditional phone service, connect the cable to your phone and the Phone port on the dual-port filter.
- Black Power Cord: Connects to an electrical outlet and your Gateway.
- Yellow Ethernet Cable: If using a wired connection, plug this into the Gateway’s yellow Ethernet port and your computer.
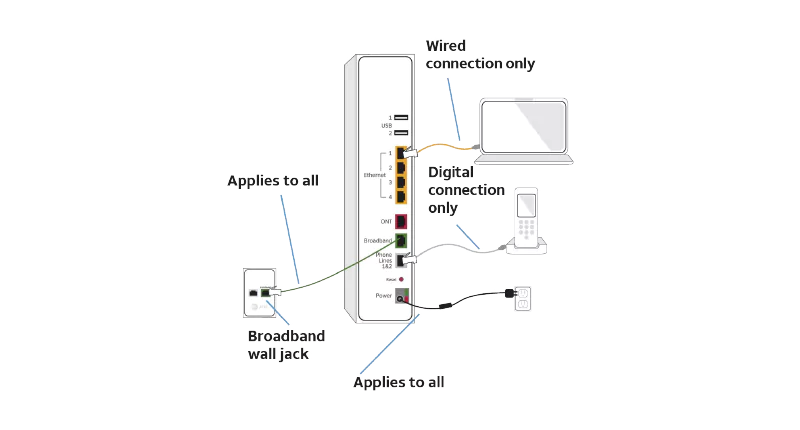
Allow about 10 minutes for your Gateway to power up. The Broadband and Service lights should turn solid green, indicating readiness.
Step 2: Wi-Fi Network Setup
On your device, open Wireless Network Settings. Choose your Wi-Fi Network (SSID), and enter the 12-digit password (found on the Gateway sticker). Open a browser and follow the online registration at att.com/Uverse, or if already registered, you are set to go.
Step 3: Customize Settings with App
When you have everything set up. Access the Smart Home Manager app or the website. Rename your Wi-Fi network and set a new password for enhanced ease of connecting devices.
With these steps, your AT&T Internet or AT&T Fiber service will be up and running smoothly, offering you the freedom and satisfaction of a successful self-installation.
Related Article: What is AT&T Next Up?
Should You Opt for AT&T Internet Self-installation?
AT&T offers customers two installation options: standard professional installation and self-installation. Deciding whether to opt for AT&T Internet self-installation or professional installation is an important choice that hinges on several key factors.
- Assess Your Comfort Level: Consider your comfort with technical tasks. If you can easily follow instructions, self-installation could be a straightforward process for you.
- Consider Your Residence: If your home is relatively new or has been previously wired for AT&T service, self-installation might be simpler. Older homes or those without prior AT&T service might present more challenges, possibly making professional installation a better option.
Shortly, your decision should be based on a balance of cost, technical comfort, and the specific requirements of your residence, including potential AT&T Internet troubleshooting needs. Both options have their merits, and the right choice depends on your circumstances, comfort level, and readiness to handle any technical issues.